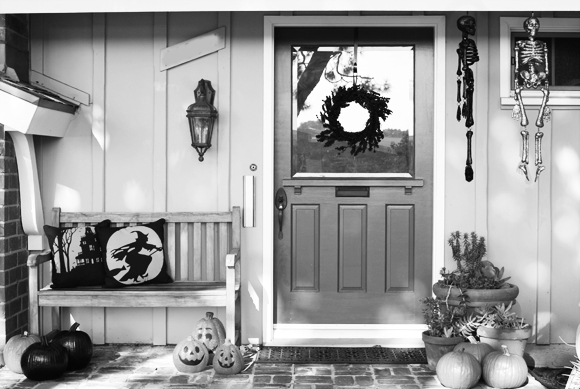
I would have told you all I would be gone for a few days but the paranoid side of me said "don't tell the internet you're going on vacation and leaving your house alone for 3 days!" Yes, I tend to be cautious that way not because you, my readers are thieves, but because somewhere out there thieves exist. It was just how I raised. My dad taught us to never leave empty boxes out on the curb for the trash man that would reveal some new hi-tech gadget purchase, lest you attract the robbers. Anytime we purchased a new VCR or even a new coffee maker, he broke down those boxes into such small pieces they were unrecognizable and stuffed them way down to the depths of the trash can. If he's ever driving around a neighborhood and sees an empty flat screen box on the curb, it takes all his strength not to pull over, get rid of the evidence and give the home owners a lecture about tempting the devil.
But anyhow, I guess it's safe to tell you all that we went to San Diego for a few days since Taylor had the week off from school. We visited La Jolla and went to the Wild Safari Park and Legoland and got back late Friday night so we wouldn't miss soccer. We were exhausted but it was a great trip. I took hundreds of pictures and while I sort through those, I thought I'd share a few pictures from around the house. We spent Saturday afternoon putting up what was left of our Halloween decorations after so many of them were destroyed by the rat bastard mouse. Which by the way, I'm certain is dead somewhere in our garage. The bait was taken and now I could swear there's a faint smell of a shriveled up dead mouse in there. Art's on excavation duty this week...
We spray painted pumpkins for the first time this year. And these bones and skulls are a new addition this year too.
We painted a house a few weeks back, and this is the new color of the mantel, after we painted it off white right before Christmas. Quite the transformation from last year at this same time.
So that's how things are looking around here. Each year I seem to get more and more into Halloween after being a stick in the mud for so long. I guess my in-laws have completely rubbed off on me :) So do you go all out for Halloween or just sail right past it?
In other news, there were supposed to be some exciting things happening on the blog here today, but due to some kinks and a mini vacation on my part, the excitement will be waiting until tomorrow. Please come back though to see what I've been cooking up!
See you guys tomorrow! Linking up with Thrifty Decor Chick's Outdoor Spaces Party
Showing posts with label Favorite Things. Show all posts
Monday, October 10, 2011
Thursday, September 29, 2011
DIY Easy Succulent Centerpiece
The succulents we rearranged and transplanted a few months back are doing great. They really love their home on the front porch and are thriving so much. I had guests over the weekend and I wanted a centerpiece to fill my living room coffee table but didn't want to spend the time or money to drive out to the store. And while floral arrangements are easy and pretty, I wanted and needed to save money. So I dug out this old Nambe tray we've had for over 12 years now, a wedding present from an Aunt, and whipped together this cute little succulent centerpiece.
Now when I see DIY/craft bloggers say they just "whipped" something up, and it's as Rachel says, "a chair made out of toothpicks and washi tape", I do roll my eyes. But this is really easy, and cheap! That is if you have some succulents on hand already. So please no eye rolling :) Let me show you...
First gather your supplies; you'll need a tray of some sort, some regular dirt/potting soil, floral moss found at any craft store, a few succulents and some small pebbles (those are optional).
If treated right, succulents will just keep growing for years and can be cut off and transferred to other pots to start new shoots. Plant one in a cute pot and cover the soil with moss and you have a great little hostess gift that's thoughtful and homegrown. Can you tell I really, really love succulents?
Now when I see DIY/craft bloggers say they just "whipped" something up, and it's as Rachel says, "a chair made out of toothpicks and washi tape", I do roll my eyes. But this is really easy, and cheap! That is if you have some succulents on hand already. So please no eye rolling :) Let me show you...
First gather your supplies; you'll need a tray of some sort, some regular dirt/potting soil, floral moss found at any craft store, a few succulents and some small pebbles (those are optional).
Spread a thin layer of your soil onto your tray, don't worry succulents don't need much to root
Start spreading your moss over the dirt, it doesn't have to be perfect by any means
and start planting/arranging your succulents in the soil
it's best to leave a little bit of stem on your succulent as seen below
once your succulents are all arranged, you can leave them as is, or...
you can arrange some pebbles/stones in a patter around the tray
give them just a bit of water, and only water as needed, about once every 7-10 days - don't over-water!
and you're done!
If you'd like some tips on planting, growing and maintaining succulents, you can visit my previous post on growing a succulent garden here. I'm not sure how widely available succulents are across the country, or even how popular they are, but here on the West Coast they're all over the place. Even Trader Joe's carries them and you can pick up little pots for as cheap as 99 cents each. If treated right, succulents will just keep growing for years and can be cut off and transferred to other pots to start new shoots. Plant one in a cute pot and cover the soil with moss and you have a great little hostess gift that's thoughtful and homegrown. Can you tell I really, really love succulents?
Labels:
Favorite Things,
Succulent Centerpieces,
Succulents
Sunday, May 15, 2011
Enjoyment - Round 2
We're heading to Yosemite later in the week and I am both excited and nervous. It's going to be 60 degrees which is cold for this self proclaimed wimpy girl from Southern California. But the campground looks very promising and I am looking forward to a 4 day break from work, computers, homework and housework. The families that we are traveling with have split up meals so I don't even have to cook most days! Reason enough to celebrate :) I have a few guest posts lined up that I hope you'll enjoy. In the meantime, here are some shots of life around our house of things I've been enjoying...
This is not my bathing suit, but I kinda wish it was. A birthday gift for Taylor, but I've been drooling over the bright and cheery print and colors. Blues, aquas and oranges=perfection.
I have officially bypassed Art as the chocolate chip cookie making champ. I don't know what I did, so who knows if I can replicate the taste next time around, but this batch came out GOOD! Art was thoroughly impressed and admitted that they were better than his :)
This is not my bathing suit, but I kinda wish it was. A birthday gift for Taylor, but I've been drooling over the bright and cheery print and colors. Blues, aquas and oranges=perfection.
I have officially bypassed Art as the chocolate chip cookie making champ. I don't know what I did, so who knows if I can replicate the taste next time around, but this batch came out GOOD! Art was thoroughly impressed and admitted that they were better than his :)
Ah, just something about spring time linens that makes a bed look so inviting. I only keep 2 sets of sheets on hand and 1 set finally ripped after 10 years of use, so it was time for a new one. Instead of the standard cream set, I took a walk on the wild side and bought stripes! Thank you Target and your $36 sale sheet sets.
My nightstand drawer is an embarrassment and I waste 5 minutes of my day trying to dig through it looking for an accessory. I finally decided I needed a tray to display watches, rings and bracelets on, but didn't want to spend any money. In keeping with Shopping My Own Closet, I shopped my own house and discovered this crystal dish my Aunt gave me for a bridal shower gift twelve years ago. It suits my simple room just perfectly.Pretty beads all set for a fun DIY necklace project. Full post coming soon with tutorial...
And finally, seeing my children turn into little jewelry making apprentices made me smile. I knew I saved all of my beading supplies from high school for a reason. I have a stash of beads I collected for years that the kids found amazing. Between the two of them they made about 6 necklaces. I love finding new projects for us to do together that help spark creativity. Makes my heart sing.Sunday, May 1, 2011
Red Fruit Love
Strawberry Love:
1. Strawberry Ginger Caipirosca ~ doesn't this look so refreshing?
2. Quick Strawberry Jam ~ 3 ingredient recipes are my favorite
3. Williams Sonoma Strawberry Huller ~ I would so buy this little kitchen gadget
4. Strawberry Ice Cream ~ an simple recipe for our ice cream maker. I think I'd add bananas on top
5. Strawberry Enamel Necklace ~ I love the little pop of color this would provide any outfit
6. Handmade Strawberry Lip Balm ~ this would be a nice alternative to my favorite strawberry Chap Stick}
Two out of four of my posts last week involved strawberries, as seen here and here. Tis the season I guess. I love this time of year when you can buy a crate of ripe red fruit for just a few dollars. And I love how it works out that the strawberry is the least expensive when it is the most delicious. We went strawberry picking at Tanaka Farms last week, and if you live anywhere locally in the greater Southern California area, I highly recommend this adventure. While I had big plans of making jam with our baskets of sweet fruit, they didn't even last one day before they were gobbled up.
We are growing our own strawberries this year a little bit differently. Using a tip from my green thumbed mother in law, we are keeping our berries safe from critters by growing them in an old metal wheelbarrow (luckily we had one on hand). We drilled a few drainage holes in the bottom, filled it with nice organic bumper crop, and planted away. From past experience, my mother in law highly recommends a metal over plastic wheelbarrow, as the plastic bakes in the sun and in turn cooks your little berries. Wish us luck! Hopefully we'll have our own bounty to pick from in just a couple of weeks.
How was everyone's weekend? Such a plethora of events going on in the world and even in my small little world. This week I promise to share what I ended up getting Art for our Anniversary, and I'd also like to share a bit about my final days of work...And now I go back to watch the TV and see history unfold right before my very eyes. God Bless America tonight, and God Bless our very brave, brave troops. I'd like to thank each one of you that has valiantly fought for our country these past ten years, and long before that. I'd love to have you all over and I'd make you a big tub of strawberry ice cream :)
1. Strawberry Ginger Caipirosca ~ doesn't this look so refreshing?
2. Quick Strawberry Jam ~ 3 ingredient recipes are my favorite
3. Williams Sonoma Strawberry Huller ~ I would so buy this little kitchen gadget
4. Strawberry Ice Cream ~ an simple recipe for our ice cream maker. I think I'd add bananas on top
5. Strawberry Enamel Necklace ~ I love the little pop of color this would provide any outfit
6. Handmade Strawberry Lip Balm ~ this would be a nice alternative to my favorite strawberry Chap Stick}
Two out of four of my posts last week involved strawberries, as seen here and here. Tis the season I guess. I love this time of year when you can buy a crate of ripe red fruit for just a few dollars. And I love how it works out that the strawberry is the least expensive when it is the most delicious. We went strawberry picking at Tanaka Farms last week, and if you live anywhere locally in the greater Southern California area, I highly recommend this adventure. While I had big plans of making jam with our baskets of sweet fruit, they didn't even last one day before they were gobbled up.
We are growing our own strawberries this year a little bit differently. Using a tip from my green thumbed mother in law, we are keeping our berries safe from critters by growing them in an old metal wheelbarrow (luckily we had one on hand). We drilled a few drainage holes in the bottom, filled it with nice organic bumper crop, and planted away. From past experience, my mother in law highly recommends a metal over plastic wheelbarrow, as the plastic bakes in the sun and in turn cooks your little berries. Wish us luck! Hopefully we'll have our own bounty to pick from in just a couple of weeks.
How was everyone's weekend? Such a plethora of events going on in the world and even in my small little world. This week I promise to share what I ended up getting Art for our Anniversary, and I'd also like to share a bit about my final days of work...And now I go back to watch the TV and see history unfold right before my very eyes. God Bless America tonight, and God Bless our very brave, brave troops. I'd like to thank each one of you that has valiantly fought for our country these past ten years, and long before that. I'd love to have you all over and I'd make you a big tub of strawberry ice cream :)
I'm also linking up to Heather's Life Made Lovely Mondays :)
<
Tuesday, April 12, 2011
Pretty, Pretty
Often times when I am hosting a party, I will skip the typical decorations and just place a few nice floral arrangements on tables as centerpieces and in key areas of the house such as an entryway table, the food table and the guest bath. Add some votive candles and you're set.
I used to make my own centerpieces, but often times found that the money and time I spent on fresh flowers did not necessarily translate into the look of the finished product. Bottom line, I may have adequate taste in flowers, but I am no florist, so my floral arrangements would usually end up looking a bit amateur. A few years back though I started making friends with my local florist and asked if they could make the arrangements for me if I supplied my own vases. They were happy to do so, and the finished product was a professional floral arrangement at a fraction of the cost.
I have been using this method ever since. The morning of an event, I drop off my vases, let them know the color theme I am going for, as well as my budget per arrangement, which is the most important part. Within a couple of hours I pick up beautiful arrangements and I've freed up my time to take care of other party details, like cleaning the house or preparing food. The budget for my party was fairly small, therefore lots of Gerbera Daisies were used, but I think the use of roses, tulips and hydrangeas in a small way, as well as gorgeous greenery helped to elevate these arrangements quite a bit. They even wrap the vases in fabric and ribbon for an added touch. So I guess I bought myself balloons and flowers :)
I used to make my own centerpieces, but often times found that the money and time I spent on fresh flowers did not necessarily translate into the look of the finished product. Bottom line, I may have adequate taste in flowers, but I am no florist, so my floral arrangements would usually end up looking a bit amateur. A few years back though I started making friends with my local florist and asked if they could make the arrangements for me if I supplied my own vases. They were happy to do so, and the finished product was a professional floral arrangement at a fraction of the cost.
I have been using this method ever since. The morning of an event, I drop off my vases, let them know the color theme I am going for, as well as my budget per arrangement, which is the most important part. Within a couple of hours I pick up beautiful arrangements and I've freed up my time to take care of other party details, like cleaning the house or preparing food. The budget for my party was fairly small, therefore lots of Gerbera Daisies were used, but I think the use of roses, tulips and hydrangeas in a small way, as well as gorgeous greenery helped to elevate these arrangements quite a bit. They even wrap the vases in fabric and ribbon for an added touch. So I guess I bought myself balloons and flowers :)
And this my friends, is my attempt at acting like I am the hostess with the mostess
and am oh so sophisticated, when really I am always scrambling around at the last minute
and will usually greet guests at the door with wet hair and no makeup!
But hey, at least I have pretty flowers in hand!
This will also be the last post you hear about my birthday, I promise :)
and am oh so sophisticated, when really I am always scrambling around at the last minute
and will usually greet guests at the door with wet hair and no makeup!
But hey, at least I have pretty flowers in hand!
This will also be the last post you hear about my birthday, I promise :)
Happy Tuesday!
Monday, April 4, 2011
Succulent Gardens
Ten years ago we received a cactus and succulent garden as a housewarming gift from my Aunt Grace. To me, it screamed old lady from the high desert, but to Art, it screamed cool and he became fascinated. He started a collection of cactus and succulents that grew and moved with us to two homes. When Taylor was born and then became mobile, I was able to talk him into to throwing away all of the cacti, many of which scared me just to look at. Some towered 2 feet tall and had spikes at least an inch long. He begrudgingly agreed, but he convinced me to let him keep his succulents.
I'm glad he did because I have now grown quite fond of them, with their pretty colors and textures and virtual hassle-free maintenance. Bonus points that they are now considered tres-chic. We are constantly collecting bits and pieces on our walks and when we visit nurseries. Today we picked a tiny branch off of a pot in the Bloomingdale's courtyard. You can stick the smallest nub, or sometimes even just a leaf into the tiniest amount of soil and months later you have a full blown succulent.
We stick bits and pieces into pots we keep on the side of the house filled with cactus soil (a very important factor) and just let them go wild, and then when we have a nice collection we trim, prune and transplant into fresh new pots to make pretty arrangements.
Today we focused on filling up the large pots that sit on our front porch. I've grown quite tired of replanting the pots every 2-3 months with fresh flowers. Costly and time consuming. I love the color that fresh flowers bring to the front of a house, but we have a lot going on in the next few months and I have a feeling that I am really going to crave and love nothing more than maintenance free.
By the way, the kids love the succulents way more than your average flower. They find them absolutely fascinating, carefully comparing all their unique shapes, textures and colors. They helped with most of the arranging and the design today. The big pot on the top left in the picture below is the family pot. The one to the right is the "boy" pot, or Sydney and Daddy's pot, and the pot on the bottom right is the "girl" pot, or Taylor and Mommy's pot. Everything in this house lately has been very gender specific, even the potted plants.
P.S. the little spiky tree-like succulent that I am pruning is from the original cactus garden we received from my Aunt ten years ago. We have grown and transplanted bits and pieces of it into several pots and it just keeps living on. I love that and think it is just amazing.
I'm linking up to Heather's Life Made Lovely Monday. Did you see she has a new home?!?
I'm glad he did because I have now grown quite fond of them, with their pretty colors and textures and virtual hassle-free maintenance. Bonus points that they are now considered tres-chic. We are constantly collecting bits and pieces on our walks and when we visit nurseries. Today we picked a tiny branch off of a pot in the Bloomingdale's courtyard. You can stick the smallest nub, or sometimes even just a leaf into the tiniest amount of soil and months later you have a full blown succulent.
We stick bits and pieces into pots we keep on the side of the house filled with cactus soil (a very important factor) and just let them go wild, and then when we have a nice collection we trim, prune and transplant into fresh new pots to make pretty arrangements.
Today we focused on filling up the large pots that sit on our front porch. I've grown quite tired of replanting the pots every 2-3 months with fresh flowers. Costly and time consuming. I love the color that fresh flowers bring to the front of a house, but we have a lot going on in the next few months and I have a feeling that I am really going to crave and love nothing more than maintenance free.
By the way, the kids love the succulents way more than your average flower. They find them absolutely fascinating, carefully comparing all their unique shapes, textures and colors. They helped with most of the arranging and the design today. The big pot on the top left in the picture below is the family pot. The one to the right is the "boy" pot, or Sydney and Daddy's pot, and the pot on the bottom right is the "girl" pot, or Taylor and Mommy's pot. Everything in this house lately has been very gender specific, even the potted plants.
P.S. the little spiky tree-like succulent that I am pruning is from the original cactus garden we received from my Aunt ten years ago. We have grown and transplanted bits and pieces of it into several pots and it just keeps living on. I love that and think it is just amazing.
I'm linking up to Heather's Life Made Lovely Monday. Did you see she has a new home?!?
Subscribe to:
Posts (Atom)