It occurred to me after we were already driving home that we probably shouldn't have taken a few of the acorns we found on our trail hike. At the minimum we probably broke some sort of nature center law and/or etiquette about leaving nature exactly as we had found it. Aside from rule breaking though, we probably caused a squirrel to have to work a little harder for his meal that day, which does make me a little sad.
To read the rest of this tutorial, please visit it on my new blog For the Love Of here
Showing posts with label Tutorials. Show all posts
Monday, August 15, 2011
Thursday, August 4, 2011
Make Your Own Arm Party - DIY Time!
It was fun putting together all the arm party looks I've sported in yesterday's post, and I'm now even more excited to send out my friendship bracelets to my swap partners. I hope it inspired you to get creative with your arm gear and have a party of your own. If so, I've created 3 new friendship bracelet/arm party tutorials to share with you all. The best thing about these bracelets is that they're easy, cheap and fast to make. Feels so good to have some creative juices flowing again, but I've gotta tell you my fingers are sore! I think I'll be putting the bracelet making supplies away for a little bit and give my fingers a rest. In the meantime, here's some ideas to help you get your party started.
For this one all you'll need is your leftover chain link & cording from this tutorial. Cut 2 pieces of cording (per bracelet) about 12" in length so that you have plenty of room to work with. FYI, total cost breakdown for this project was less than $6 and so far I've made 6 bracelets with my supplies! Total time spent on each bracelet is less than 5 minutes.
This bracelet is my personal favorite because I was finally able to find a way to use these geometric square beads I picked up a while ago. This bracelet is just as simple as the first one, requiring you to just do some knotting. You'll need about 22" of cording and some cool beads, but make sure the bead opening is large enough to fit the cording through. I gave mine a cleaner look by attaching a lobster claw & jump ring closure to the end, but this is purely optional. You can just use the same loop and knot technique as seen in tutorial #1 above. Total time spent on each bracelet was about 15 minutes and total cost was less than $3 each.
Using the same wrapping technique from this tutorial, I added these round beads to some leather cording for more of a clean look. You'll just need some beads, embroidery floss and leather cording. Of course you can just as well use the cording from the previous tutorials, but I love the color and texture of the leather against the smooth & shiny beads. I cut my cording & embroidery floss 24" long. Total time spent on this bracelet was about 20 minutes (it takes a little longer to carefully wrap the string of beads) and total cost was less than $3 each.
So which one is your favorite and are you most likely to try? I made a total of 8 bracelets in less than 2 hours, and that's with me taking photos along the way, so you can easily have a few of these done in a weekend afternoon. I hope you enjoyed these DIY's and please let me know if you try any!
Linking up to Today's Creative Blog Get Your Craft On Tuesday
Wednesday, August 3, 2011
Arm Party - The Best Of
What a difference an adjustment in attitude makes! After a few weeks of being unmotivated and uninspired, it seems yesterday's post helped me spin my attitude around a bit. I've had bracelets on my mind, with Jen's Friendship Bracelet Swap & the Bloggers Do It Better Arm Party challenge coming up, but I've been paralyzed in being able to create anything. Well it seems last night creativity sparked and while sitting down to watch a little RHONY Reunion part deux, I came up with about 5 new bracelet ideas; pictures and tutorials coming up tomorrow! *UPDATED TO ADD TUTORIAL LINK HERE!!
I also started looking through my pictures and found plenty of arm party inspiration shots that I've already worn in the past few months. So instead of creating a whole new look for the BDIB challenge, I decided to just gather up the best of the best for a little look at all the ways I've been having an arm party lately. What is an arm party you ask? Really it's just the idea of throwing on a stack of bracelets, sometimes worn with your watch to create a multilayer, textured way of accessorizing. So here we go...
I wore this look with a very lady-like jacket seen here so I didn't want to get too crazy with the arm party. I'm wearing bracelets from Forever 21 and a Michelle watch.
Pretty much the same look as above, but I added the sequin leather wrap cuff to glitz up the camo. All bracelets from Forever 21 and watch by Michelle.
Ahh, my first bracelet tutorial pieces that I love so much! Just a simple stack of satin and sequins wrapped bangles add instant glam to any look, and is a fun juxtaposition to the masculine camo.
Simple look for a very preppy and casual outfit. Sometimes you have to know when to hold back a little on the arm party, and this look was definitely one to go easy on.
Again, I wanted to keep the arm party simple here to highlight the fun brightly colored shorts, so I just added my leather wrap cuff from J. Crew and my gold Stella & Dot chain link bracelet. The gold Michael Kors watch is chunky and heavy, so you have to keep functionality in mind when getting ready for your arm party.
The best thing to do when assembling your arm party is to just have fun. If you're feeling adventurous and your day allows your arm to be a little more weighted down, add a few more bracelets. But if you start to feel ridiculous and are afraid you'll never be able to get through the day taking care of kids and/or work, minimize the look. It's all about making it your own.
So with that, I'm off to take some shots of the bracelets I have in store for you tomorrow. They are all cheap to make, and can be made in a matter of MINUTES! I'm so excited!! Have a great day everyone. BTW, I'm also linking up to Lindsey's WIWW!
P.S. If my over use of !!! and positive attitude starts to annoy you, go ahead and tell me. I'm a big girl, I can take it ;)
I also started looking through my pictures and found plenty of arm party inspiration shots that I've already worn in the past few months. So instead of creating a whole new look for the BDIB challenge, I decided to just gather up the best of the best for a little look at all the ways I've been having an arm party lately. What is an arm party you ask? Really it's just the idea of throwing on a stack of bracelets, sometimes worn with your watch to create a multilayer, textured way of accessorizing. So here we go...
I wore this look with a very lady-like jacket seen here so I didn't want to get too crazy with the arm party. I'm wearing bracelets from Forever 21 and a Michelle watch.
Pretty much the same look as above, but I added the sequin leather wrap cuff to glitz up the camo. All bracelets from Forever 21 and watch by Michelle.
Ahh, my first bracelet tutorial pieces that I love so much! Just a simple stack of satin and sequins wrapped bangles add instant glam to any look, and is a fun juxtaposition to the masculine camo.
Another fun tutorial, this friendship bracelet was inspired by the ones I have from Forever 21. Surprisingly, I got almost as many comments on my nail polish as I did on my tutorial (polish is Mermaid's Tears btw from OPI :)
I love this stack for the EBEW lace challenge look last month. Bracelets are a mix of Stella & Dot, DIY by me, Forever 21 and J. Crew. Watch is by Michael KorsSimple look for a very preppy and casual outfit. Sometimes you have to know when to hold back a little on the arm party, and this look was definitely one to go easy on.
Again, I wanted to keep the arm party simple here to highlight the fun brightly colored shorts, so I just added my leather wrap cuff from J. Crew and my gold Stella & Dot chain link bracelet. The gold Michael Kors watch is chunky and heavy, so you have to keep functionality in mind when getting ready for your arm party.
The best thing to do when assembling your arm party is to just have fun. If you're feeling adventurous and your day allows your arm to be a little more weighted down, add a few more bracelets. But if you start to feel ridiculous and are afraid you'll never be able to get through the day taking care of kids and/or work, minimize the look. It's all about making it your own.
So with that, I'm off to take some shots of the bracelets I have in store for you tomorrow. They are all cheap to make, and can be made in a matter of MINUTES! I'm so excited!! Have a great day everyone. BTW, I'm also linking up to Lindsey's WIWW!
P.S. If my over use of !!! and positive attitude starts to annoy you, go ahead and tell me. I'm a big girl, I can take it ;)
Monday, July 11, 2011
DIY Tassel & Bead Chain Necklace Tutorial
Hi Friends! How was your weekend? Taylor and I are back from Scottsdale where we visited and celebrated my dear friend Lea's baby shower and got some much needed girl time as Syd and dad got to have some boy time. They saw Cars 2 and went to an outer space themed birthday party. Syd was in heaven. I got home on an early flight Sunday morning and had a bit of spare time to finish up this fun necklace I've been working on. I drew inspiration from this Isabel Marant necklace that is originally $175, and while mine didn't come out exactly as fancy as the original, it's still a fun and VERY easy addition to my growing DIY jewelry collection.
There was a lot of love for the Seed Bead necklace tutorial, but the overwhelming theme was that many of you didn't know if you'd have the patience or time to string that many little beads. I feel your pain, so this necklace is made out of larger beads, and since it's only one strand, you can finish this project in just about an hour! You need a few more supplies than you did with the seed bead necklace, but they are all inexpensive so you can get everything you need for just around $20. Let's get started with what you'll need:
Also not listed is a pair of wire cutters to cut your chain and some sort of fabric (details to follow) for your tassel. The beads I used are a glass bead and cost a total of $6 from a genuine bead store. I also wanted a more unique looking chain than the options I found at Michael's so I bought my chain for $3.99 at the same bead store. The crimp beads are on the smaller side, but any size will do really; the jump rings are 7mm, the head pins are 2 inches but you can definitely use shorter ones, and the bead wire is 9.2m.
Start by adding a jump ring to one end of the chain and then with a crimp bead already on the stringing wire, loop the stringing wire through the jump ring
To change the tassel from black to white it's as simple as undoing the jump ring with your pliers and attaching the other tassel. I love the black for a night time look and then the white for more of a day look. I wore the white with a navy and striped maxi dress and it really popped against the navy.
I know it seems like there is a lot of "steps" to this necklace, but really when you break it down into the necklace part, the tassel part and the decorative bead part, it's really very simple and easy :) Enjoy and let me know if you try it! For some of my other DIY tutorials, visit here and here
There was a lot of love for the Seed Bead necklace tutorial, but the overwhelming theme was that many of you didn't know if you'd have the patience or time to string that many little beads. I feel your pain, so this necklace is made out of larger beads, and since it's only one strand, you can finish this project in just about an hour! You need a few more supplies than you did with the seed bead necklace, but they are all inexpensive so you can get everything you need for just around $20. Let's get started with what you'll need:
Also not listed is a pair of wire cutters to cut your chain and some sort of fabric (details to follow) for your tassel. The beads I used are a glass bead and cost a total of $6 from a genuine bead store. I also wanted a more unique looking chain than the options I found at Michael's so I bought my chain for $3.99 at the same bead store. The crimp beads are on the smaller side, but any size will do really; the jump rings are 7mm, the head pins are 2 inches but you can definitely use shorter ones, and the bead wire is 9.2m.
Start by adding a jump ring to one end of the chain and then with a crimp bead already on the stringing wire, loop the stringing wire through the jump ring
Make a loop of the wire and put the other looped end of the wire through the crimp bead
Just like so
Pull tight and as close to the edge of the jump ring as possible and them crimp the bead closed with the pliers Trim off the excess end of the wire like so
And then begin stringing
Add a crimp bead to another jump ring on the opposite end of the chain to complete your necklace
Finished product without tassel :)
You can start by making a couple of decorative strung beads to hang next to your tassel by adding some beads to a head pin Twist the end into a loop
And then trim off the excess wire with the wire cutters
For the tassel, cut a few strips of sheer fabric in 3x3 squares. I used standard tulle for the black tassel and crushed tulle for the white. I much preferred the crushed tulle because it was softer and gauzier, not so stiff, but I could only find it in white at my local fabric store. You could also buy a real tassel that you use for pillows and such, it would probably look really cute, a la Love Maegan. I just couldn't find a color that I liked to go with the chartreuse green beads.
Basically just fold over the fabric and then tie a strip of tulle around the top to create a little pouf
Cut a straight line at the edge (or don't if you'd prefer not to); I just didn't want it to look so much like a ghost
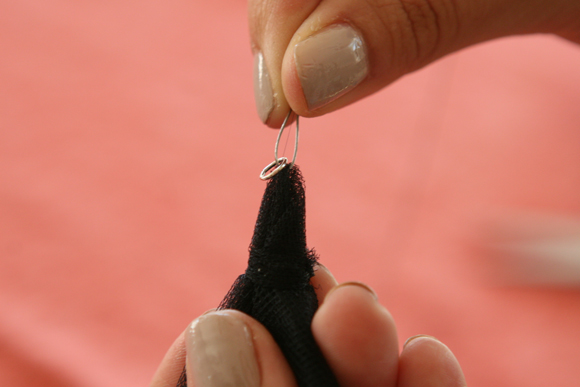
I'm sure there is a much fancier, more professional way to attach the poof but I couldn't figure it out :) So I just threaded some of the beading wire though the top with a jump ring attached and then added a crimp bead to close off. I then attached the tassel directly to the necklace with that jump ring. Add your tassel and the other decorative beads and you're done!
My necklace is a total of 36 inches in length, with the chain making up 20 inches and the beads making up 16 inches. The color options with the project are endless. My local bead store had so many crazy pretty choices it took me about 30 minutes to make a decision but I kept being drawn back to this acidic green color so just went with it. To change the tassel from black to white it's as simple as undoing the jump ring with your pliers and attaching the other tassel. I love the black for a night time look and then the white for more of a day look. I wore the white with a navy and striped maxi dress and it really popped against the navy.
I know it seems like there is a lot of "steps" to this necklace, but really when you break it down into the necklace part, the tassel part and the decorative bead part, it's really very simple and easy :) Enjoy and let me know if you try it! For some of my other DIY tutorials, visit here and here
Linking up with Today's Creative Blog for Get Your Craft On Tuesday
Labels:
DIY,
DIY Crafting,
DIY Tassel Bead Chain Necklace,
Tutorials
Tuesday, June 28, 2011
4th of July Mason Jar Luminaries
Thanks for stopping by! This DIY is no longer available here on this stie, but you can find this post in its entirety over on my new site, For the Love Of. Please visit DIY Patriotic Mason Jar Luminaries to get the DIY. Thanks so much! And Happy Crafting!
Labels:
4th of July Crafts,
DIY,
DIY Crafting,
Mason Jar Luminaries,
Tutorials
Monday, June 27, 2011
DIY Seed Bead Necklace Tutorial
This DIY project went through a few transformations before I finally settled on this particular design, and I have to say I love the way it came out. My original intent was for it to just be a plain clustered necklace that was much shorter in length, lying closer to my collarbone. But the more I worked with it, the more it just felt a little too mature. I tried braiding it, and while it looked cool, it also looked too young, almost bordering on tweenish. Finally this morning, it came to me to attach it to an existing old necklace I had on hand that was missing its pendant, and leave it as a simple long draped necklace. So while this necklace really only took about 4-6 hours to make, it took over 4 weeks for me to finally settle on a design I loved.
To get the rest of the tutorial please visit here (I've moved the best of my DIY posts to my new blog)! Thank you!!
Labels:
DIY Crafting,
DIY Seed Bead Necklace,
Tutorials
Subscribe to:
Posts (Atom)