Good Morning friends and welcome back to me! We arrived home from Park City early yesterday afternoon, and instead of unpacking we took advantage of our day by continuing with that vacation feeling by enjoying the weather, washing our cars and picnicking outside. It's time to settle back into routine though and plan our remaining 2 weeks of spring break, and unpack. What are some of your spring break plans? I am starting to get a nesting feeling so will be doing some spring cleaning and also visiting our local museums and the Huntington Gardens & Library.
I have some fun neon posts lined up for the week, but first I wanted to share some of my favorite Easter posts from the last couple of years in case you still needed some ideas.
Easter Bunny Paw Prints is a fun tradition we started about 5 years ago and will continue it until the kids no longer believe in the Easter Bunny I guess ;)
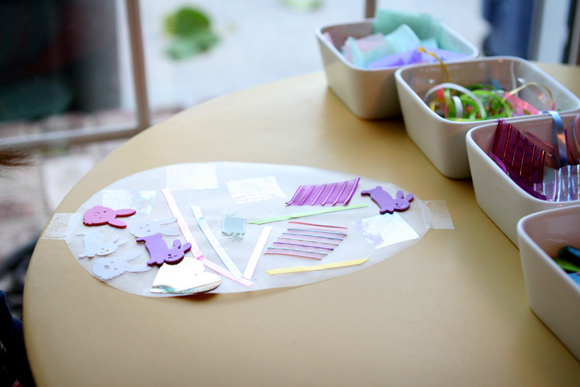
A simple and easy craft for this week, especially for preschoolers through 1st graders are to make these Contact Paper Easter Eggs.
If you grew your own grass eggs this year (I was too lazy and tired to do the project this time around), you can put them to good use and make Grass Egg Place Settings for your Easter feast.
I've been out of the loop this past week, so please share if you've made or have seen any great Easter inspired crafts or recipes out there. I'd love to do something with the kids this week!
Oh, and the winner of the Ike & Co. giveaway is Anne of Modern Mrs. Darcy! Congratulations Anne!
Showing posts with label Contact Paper Easter Eggs. Show all posts
Monday, April 2, 2012
Wednesday, April 13, 2011
Kid's Easter Craft - Contact Paper Eggs
I take absolutely no credit for these fun little Easter eggs made from contact paper; all credit is due to Taylor and Syd's preschool teachers Mrs. Bailey and Mrs. Hill. Taylor made one of these eggs last year and Syd had a chance to make his own last week. I worked in his classroom that day so I got to see him in action carefully crafting his egg. He loved it so much I knew we had to make more at home, especially since I had an entire roll of contact paper laying around just taking up space.
The kids love this craft because of the sticky texture of the paper and the freedom to create their own collage into whatever design they want. Every single child that made this craft in Syd's preschool all said "It's sticky!!" Such a cute reaction. I would say this craft is good for ages two - seven.
For this craft you'll need:
* Contact Paper
* Various fun bits of tissue paper, cellophane tissue, stickers, confetti, ribbon, whatever really!
* Tissue paper for the backing (or for an entirely clear egg you simply line in more contact paper)
* Tape
* Scissors
Start by cutting the contact paper into the shape of an egg. Ours were about 9.5" x 6.5" (I fold mine in half to do half the cutting; don't worry, the crease won't be visible when all is said and done)
Peel the backing off of the contact paper and place the contact paper sticky side UP, and tape in place at top and bottom so it doesn't slip around.
And then let the kids just start designing their collage. Taylor is of course much more deliberate in the design, carefully placing each strip of ribbon and paper, whereas Syd carefully chooses each item, and then just plops them wherever :)
Once the egg is complete, peel off the little pieces of tape and then place the tissue paper (or another sheet of contact paper if you want a clear egg) onto the sticky part of the paper. Press into place really well so it's as smooth as possible, and then cut out the excess paper to reveal your egg!
Now let's be honest, this isn't the most beautiful of all beauties of a craft. This is very much a child's craft; even the egg I made came out a little elementary. We're not going for perfection here though ;) The kids honestly love this one so much and it keeps them content and occupied for a good 30-45 minutes at a time. Taylor had a friend over today and they both sat there for 45 minutes crafting an entire scene. Now that's pretty impressive, considering they both had American Girl Dolls they could have been playing with. Happy Easter friends, and please let me know if you try this one!
The kids love this craft because of the sticky texture of the paper and the freedom to create their own collage into whatever design they want. Every single child that made this craft in Syd's preschool all said "It's sticky!!" Such a cute reaction. I would say this craft is good for ages two - seven.
For this craft you'll need:
* Contact Paper
* Various fun bits of tissue paper, cellophane tissue, stickers, confetti, ribbon, whatever really!
* Tissue paper for the backing (or for an entirely clear egg you simply line in more contact paper)
* Tape
* Scissors
Start by cutting the contact paper into the shape of an egg. Ours were about 9.5" x 6.5" (I fold mine in half to do half the cutting; don't worry, the crease won't be visible when all is said and done)
Peel the backing off of the contact paper and place the contact paper sticky side UP, and tape in place at top and bottom so it doesn't slip around.
And then let the kids just start designing their collage. Taylor is of course much more deliberate in the design, carefully placing each strip of ribbon and paper, whereas Syd carefully chooses each item, and then just plops them wherever :)
Once the egg is complete, peel off the little pieces of tape and then place the tissue paper (or another sheet of contact paper if you want a clear egg) onto the sticky part of the paper. Press into place really well so it's as smooth as possible, and then cut out the excess paper to reveal your egg!
Now let's be honest, this isn't the most beautiful of all beauties of a craft. This is very much a child's craft; even the egg I made came out a little elementary. We're not going for perfection here though ;) The kids honestly love this one so much and it keeps them content and occupied for a good 30-45 minutes at a time. Taylor had a friend over today and they both sat there for 45 minutes crafting an entire scene. Now that's pretty impressive, considering they both had American Girl Dolls they could have been playing with. Happy Easter friends, and please let me know if you try this one!
Subscribe to:
Posts (Atom)