Quantcast
Showing posts with label Recipes. Show all posts

Wednesday, June 27, 2012

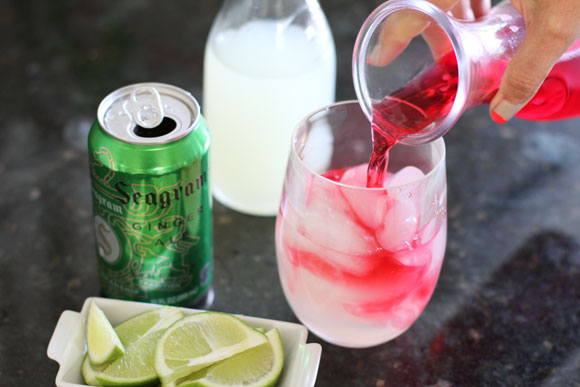
Ginger Ale, Cranberry & Limeade Spritzer


I have to say that this is the most enjoyable pregnancy I've had by far. I feel more relaxed, beautiful and comfortable than I have in the past. As I've said before, just about the only thing I do miss is being able to relax at the end of the day with a glass of wine or a cocktail, especially on the weekends when everyone is hanging out by the pool. But never wanting to feel left out, I have been playing around with making myself some fun and festive drinks to enjoy, especially as the weather heats up, and this spritzer is one of my favorites so far. The kids are obsessed with it too. It's simple to make and you can customize it to your specific juice preferences, but I've gotta say it doesn't get much better than the limeade and cranberry mix, with a large splash of ginger ale. Making this drink makes me feel like I'm not missing out on anything.
To mix your spritzer, start with a cup filled with ice. Fill the glass half full with the limeade, then add the cranberry juice till the glass is 3/4 of the way full. Top off with a heavy splash of Seagram's Ginger Ale and a squeeze of lime. Stir if you like, and enjoy! Ridiculously easy, right?
During the rough weeks of the first trimester I drank ginger ale nonstop. Ginger ale and iced cold water were about the only things that sounded good to me and were the only drinks that didn't make me even more nauseous. My taste for it continued even after my morning sickness stopped, and so I've been drinking it on its own or mixed in with juices throughout the whole pregnancy. I love the crispness of Seagram's Ginger Ale, and that it has a lighter ginger taste than some other brands. Using it in the spritzer allows for the flavors of the juices to really shine through and not compete with really heavy ginger flavors.
With this spritzer in hand I'm ready to enjoy summer, spending time by the pool and eating outdoors, relishing in this very special time in my life. I truly feel very peaceful and blessed to be enjoying this pregnancy so much, surrounded by loving and supportive friends and family. Life doesn't get much better than this right now. I'm the perfect candidate for the cool Seagram's Facebook App they just launched, called "Good To Be You." Slap a big GTBU stamp on my face, because I really do feel happy and good being me right now.

This post was sponsored by BlogHer and Seagram's Ginger Ale, but the opinions and recipe are all my own.

Sunday, May 27, 2012

Granny Smith Cheeseburgers

Most of my favorite recipes I make over and over again, including the ones that I've featured here, harken back to my childhood in one way or another.  Whether it be trying to recreate something my grandma made or just using an ingredient that my mom always used to make, my cooking usually goes back to my childhood roots.  I'm guessing if food was a big part of your childhood, it does for you too.  When I was given the opportunity to create a recipe post using Kraft Singles I jumped at the chance because I've been eating and cooking with Kraft Singles for as long as I can remember.  Not one single grilled cheese sandwich or cheeseburger in this house is made with something other than good ol' American.  I think I may even have responded to the opportunity with the statement "Are you kidding me?  I have the Costco size box of Kraft Singles!"  I may have even offered up pictures as proof.  You know, just in case they thought I was lying ;)

This cheeseburger recipe I'm sharing today is ridiculously easy and is one we've made several times when we wanted something just a tad different than the usual.  It's Americana mixed with a tinge of fanciful novelty.  You'll both impress and delight your guests if you grill these babies up at your next BBQ, I promise you that.  My father in law is a tough critic and he admitted to me last night that these were in fact "dang good burgers."   
Granny Smith Cheeseburgers (makes 4 large size burgers):
1 lb ground beef (or ground turkey)
1 granny smith apple finely chopped + 1 thinly sliced for topping
Salt & Pepper
4 Kraft Singles & Buns

Mix up the ground beef and chopped granny smith apples, add salt and pepper to taste.  Shape into 4 1/4 lb patties and grill as desired, topping with a slice of Kraft Singles in the last minute of grilling.  Add your condiments on your bun (I prefer just mustard with this kind of cheeseburger), and add a slice or two of granny smith apple.   
The cheese melts perfectly on the patty and the sharpness of the cheese mixed with the tartness of the apple and savory meat is quite possibly the perfect combination.  I especially love that I don't have to worry about messing with slicing up tomatoes, lettuce, onions and all that.  This burger really does taste best nice and simple with just the sliced apple serving as your only topping.

As always, please let me know if you give these a try.  It would be the perfect new cheeseburger to try for Memorial Day tomorrow. 

As part of the Foodbuzz Tastemaker Program, I received a coupon for free Kraft Singles and a stipend.  The opinions expressed here are my own.

Friday, February 17, 2012

Grandma Tita's Green Chile Chicken Enchiladas

It occurred to me the other day that it's been a while since I've "bared my soul" if you will.  It got to be a somewhat regular occurrence here on the blog for a while.  I was wondering why for the past few months I haven't felt the need to emotionally vomit on here, and I guess simply put, life is good.  Oh sure, I'm still neurotic and worry about many of the same things I used to, but many of the things that were weighing on me have either been resolved or I just don't feel the need to write about them anymore.  I turn to my husband, or my friends and talk about things.  Ask for advice, discuss things that I have questions about.  This blog and all of you guys will always be a great source of encouragement to me, but in this season of my life I, for the most part, feel content, and if I'm not feeling content, I've been praying or talking it through instead of writing I guess.  There are so many wonderful narrative, personal blogs out there that do a much more beautiful job of penning out the everyday that we all struggle with, you don't really need to hear me wax on about the stresses of parenting, or how I still after almost a year, feel torn about my decision to quit my job.

I don't really know why I'm saying all this, and I realize that this is most likely the most random and longest introduction to a recipe post ever.  But I guess I just wanted to let you all know, especially those that have been reading for a long time and have always inspired and encouraged me, that I'm still here, and I'm still me, just a little better adjusted than I was a year ago.  But have no doubt, I'm still a bit crazy, still emotional, still cry at the drop of a hat.  In fact as I write this I'm crying, and as I look at the pictures of me and my mom making enchiladas, the ones my dear beloved Grandma used to make, huge crocodile tears are streaming down my face.

Ah, enough!  Here's the recipe for my Grandma Tita's Green Chile Chicken Enchiladas.  They are quite honestly amazing.  Let me give you all some advice.  If there is someone in your life, a mother or grandma, that has special recipes that she makes on a routine basis, learn to make those recipes.  When they are gone, it will save you, and encourage you.  I promise you that.  Here in Southern California, green chile chicken enchiladas are a dime a dozen.  I can think of at least 6 restaurants within a 5 mile radius that serves them.  But NONE of them taste like these, these taste like home to me.  They taste like Grandma and Mom and my sister and my aunt and all the women on my mom's side of the family that I love.  That's what homemade food can do to you, for you.  So no matter how simple or ordinary or common a loved one's recipe may seem, LEARN IT!  You will never, ever regret it.

Grandma Tita's Green Chile Chicken Enchiladas
1 whole 3-4 lb chicken
1 whole onion
1 3 dozen package of corn tortillas
vegetable oil (several tablespoons to fry tortillas in)
2 lbs of shredded cheese
2 32 oz cans of Las Palmas green chile sauce

Start by boiling the chicken in a large pot filled with water, 1 cut up onion, 1 bay leaf and salt and pepper.  Depending on the size of your chicken, boil from 35-45 minutes.  Once cooked, remove from pot and let cool before shredding.  I usually put it in a large bowl in the fridge for an hour to get it nice and cool.  Once cool, shred the chicken into small bite size pieces.  Set shredded chicken aside.
 Heat up 2-3 tablespoons of vegetable oil on medium heat, and begin to fry your tortillas.  Working with one at a time, set tortilla in oil and let fry for about 15-20 seconds, just enough time to soften the tortillas up, but you do not want them to get hard at all.  Watch out for this.  You want them to just soak up the flavor yet still be pliable enough to fold up.  I usually do 3-4 tortillas, then lay them out in the pan to start rolling, turn off the heat, and go back when done rolling.  A tedious process, but well worth it.  You want the tortillas to still be nice and warm when working with them, which is why you don't fry all the tortillas all at once.  Of course you could always work in an assembly line with another person and make your life a whole hell of a lot easier ;)
Place a small handful of shredded cheese into a tortilla, then some chicken, then a bit more cheese.  Roll up nice and tight, and repeat the process.  Depending on how generous you are with your cheese and chicken, you will get anywhere from 24-32 enchiladas out of one chicken (enough to fill 2 baking pans).
Once you've finished rolling your enchiladas, get your Las Palmas ready.  Now I know what you may be thinking here; canned enchilada sauce, really?  I know, I know, but hear me out.  Have you ever made your own chile sauce?  It's a pain, and this stuff just has the best flavor.  My grandma made most everything from scratch including her tamales and beans, but sauce was just something she didn't mess with.  I don't begrudge her for it one bit ;)
So pour on your sauce.  Between your two pans of enchiladas you will use at least 1.5 cans, and I always like to reserve about 1/2 a can to pour on after they're done cooking if you wish.  Sometimes they get a little dry when baking, so the extra sauce helps to moisten them back up.
Once your sauce is poured on top, smoother them with a bit more shredded cheese and bake them up!  25-30 minutes in a 350 degree oven should be just enough to get them nice and hot and the cheese melted.
Now here's the thing that I've discovered about Mexican food, it never really looks that good in pictures.  Yes, I admit, I am not the best at styling and photographing food, but even in Mexican restaurants the pictures in the menu always just sort of look like a big blob of stuff with cheese smothered on it.  Don't you think?  I'm sure Adam and his partner Matt could make these enchiladas look freaking amazing, like you hear angels sing  when you look at the photo, convincing you that heaven must look, or taste something like a gooey cheesy enchilada.  But me?  Not so much.  All this to say, don't hold this very sad picture against the enchiladas.  Even though they look sort of meh, believe me they are anything but.  As I always suggest, serve alongside Grandma Tita's Spanish Rice, some good ol' frijoles, and of course a margarita or Dos Equis, and you'll be having yourself a rip roaring good time.   

It's the weekend friends, so have a good one.  Make something fattening and gooey and enjoy.  You only live once after all, make it count.  

Wednesday, December 28, 2011

Seasonal Cocktail - Clementine Margaritas

This time of year it seems I've always got clementines coming out the wazoo.  Between neighbors, CSA boxes and usual trips to the grocery store where the kids always beg for the 5 lb bag I have enough clementines to stave off scurvy for a ship full of sailors for a year.  We hosted a pre-Christmas bash last week and I put those cuties to good use, making these simple clementine margaritas for the adults. 

Apologies for the hastiness of the shots; it was 2 pm and my parents were about to come over.  I didn't want to have to explain why I was making margaritas in the middle of the afternoon.  "Why are you drinking margaritas at 2 o'clock in the afternoon Andrea?  That's not a good example for the kids.  Wait, you aren't going to drink that?  Give me that then, you can't waste good tequila!"  So here goes, all you'll need are 4 ingredients:
Start by salting your rim if you are so inclined and pour in some ice, then add in a nice shot of tequila.
Now start juicing your clementines.  For one beverage you'll need about 3, so if you're making them for a large group, I suggest getting at least a 5 lb bag and using a juicer to help the process along.
 Once you're satisfied with your juice level, add in a splash of agave and a splash of tonic water
 Give it a good stir and taste!
Garnish with a clementine twist and/or a wedge and enjoy!  This would make a great cocktail for a small New Year's Eve celebration at home with a few friends.

Friday, December 9, 2011

Persimmon Cookies

I made quite the mess this week.  While I was baking these cookies I had a moment where I looked around and literally saw 4 loads of unfolded laundry staring at me in the disaster that was my kitchen.  I hadn't even finished cleaning up the mess from making pecan snowballs before I started in on these, and don't even get me started on the office which even the kids remarked was "a mess".  I thought to myself, 'shouldn't I be better at this by now?  Shouldn't I be better at managing my time more appropriately; cleaning up one project before I start another; balancing it all?'  I started to get down on myself a bit and even thought about cancelling lunch with a friend so I can stay home and clean.  Seriously?  Boring and dull.  When I'm 80 I'm sure the memories of a perfectly organized and tidy house aren't going to be the ones that keep me going, but rather time spent baking with my kids and friends over lunch.  

So I let myself continue to make a mess the rest of the day and try to have fun while doing it.  While the mess and chaos that things like baking, crafting and just being lazy bring do drive me a little crazy, I am trying to be better about just letting it go.  The mess will still be there when I'm ready for it right?  So bake and make messes my friends.  And if you're looking for a new recipe to try, perhaps give these a test drive.
The recipe is below and is adapted from one I found on Simply Recipes, but a couple of things to note; your persimmons should be really ripe so that they're almost mushy like the picture above.  A few of my persimmons were not that ripe though so I just peeled and cut them up and tossed them in the food processor with the really ripe pulp and pureed them all together and as you can see below the puree turned out just fine.  Because persimmons are not as sweet when they aren't fully ripe, I added about a tablespoonful of agave nectar to the recipe to heighten the flavor and cut down on any bitterness.  Also, the recipe online calls for 1/4 tsp cloves, but make sure you use ground cloves, not whole cloves.  I also added 1/4 tsp nutmeg for a bit more spiciness. 
If I sound like a persimmon expert then I've successfully fooled you!  I'd never eaten or baked with persimmons before in my life.  I was stumped when I got a bunch of these in my CSA box a few weeks ago (yes, I've had these for about 3 weeks and they're still good).  I didn't even know what to do with them or how to eat them and in passing I mentioned it to my sister-in-law Kendra.  She suggested I bake persimmon cookies, a favorite of hers that her grandmother always used to make for Christmas.  Turns out they're abundance this time of year has made them a favorite ingredient for holiday cookies and the internet holds about a thousand recipes.  
Also, If you'd like your cookies to come out perfectly round, then do a better job rolling them into a log then I did.  The oblong version is the hasty, quick, rushing out the door version.   
Persimmon Cookies - adapted from Simply Recipes
Cookies:
1 1/2 cup brown sugar
1/2 cup (4 oz) unsalted butter, at room temperature
1 tsp vanilla extract
2 eggs
3/4 cup very ripe persimmon puree
1-2 tbsp of agave nectar added to puree
2 3/4 cups flour
1 tsp cinnamon
1/2 tsp salt
1/2 tsp baking soda
1/4 tsp cloves (ground, not whole)
1/4 tsp nutmeg
1 cup chopped walnuts

Glaze:
1 1/4 cups confectioner's sugar
2 Tbsp milk
1 Tbsp persimmon puree
1 tsp grated orange peel

Cream butter, brown sugar, vanilla and eggs in a large bowl. Add persimmon puree, stirring until blended.
Stir together dry ingredients in a separate bowl. Add dry ingredients to persimmon mixture a third at a time, stirring just until flour is incorporated. Stir in nuts.

Lay out plastic wrap on a large smooth surface. Place the cookie dough on the plastic wrap and form into a long cylindrical log, wrapping the dough completely with the plastic wrap. Place in freezer. Chill at least a couple of hours, until frozen or almost frozen.

Preheat oven to 375°F. When dough is fairly solid, unwrap from plastic wrap and slice with a sharp knife, 1/4" thick rounds. Lay out cookie dough rounds on stick-free cookie sheets, leaving at least an inch between the cookies. Bake for 10-12 minutes or until cookies spring back when lightly touched in center. Let cool on baking racks before frosting.

When cookies have cooled, lay out over a sheet of wax paper. Sift confectioner's sugar and then whisk with 2 Tbsp of milk until smooth. Add 1 Tbsp of persimmon puree and 1 tsp of grated orange peel and mix until smooth. Dip spoon into glaze mixture and dribble over cookies. Let harden and serve.
The cookies have a very cakey, almost muffin like texture to them.  They're not crisp if that's the kind of cookie you're looking for.  The glaze on top adds a bit of citrus flavor and heightens the persimmon flavor, and the walnuts give a great texture to what some may consider a "boring" cookie.  For someone like me though that doesn't like really sweet cookies, they're perfect.  I ate a couple while cooking dinner and didn't feel like I was totally cheating ;) 

In addition to making messes, I took the kids to see the new Muppets movie and it was so cute.  It's been so nice having Taylor off of school already.  I definitely recommend it for a fun outing with the family.  What have you all been up to this week?

Thursday, November 3, 2011

Thoughts of the Week - Comfort Food

There are some weeks when certain things just stand out at you and then there are some weeks when it all just seems to be a blur.  It's been one of those weeks.  I think a full weekend schedule of events falling into Halloween just sort of all blended together to lead me to today.  Today was a good day.  I got up early, filed 2 huge stacks of paperwork that's been on the floor, precariously strewn next to my desk for over 3 weeks.  I cleaned the house and finished sweeping down our patio from the tell tale dust of vicious Santa Ana winds.  I baked 2 loaves of bread (1 pumpkin and 1 gingerbread) and lit a candle.  I sat down and thought to myself, I feel at peace in my home right now.  But holy shit am I tired.  Dead damn beat tired.  So I don't have a lot of really thought compelling "thoughts" right now.

We've been working hard on our home these last few weeks which has a lot to do with the tiredness, and I think I'd like to share some pictures with you all next week, starting Monday perhaps.  All this hard work in our home though has made me turn to food, in a good way, in that "a piece of pie would sure settle my nerves right now" sort of way.  Oh come on I know we all have some type of food(s) that we turn to when we need a little comfort.  And not just comfort from sadness, but comfort after a hard days work when you need something that will just make you feel good.  I've been cooking a lot, and eating a lot :)  I have a list of comfort food that includes:

French Fries & Hamburger from In 'N Out
Banana Cream Pie from Polly's Pies
My Grandma's Green Chili Chicken Enchiladas
Chicken Tortilla Soup
Tater Tots & Fish Sticks
Brie, Salami & Crackers
Peanut M&M's & PayDays
Chicken Pot Pie
is this a weird list?
{cinnamon crispas}
Oddly enough, cinnamon crispas, while some may not consider quite comforting, are in fact a comfort food for me.  A bit indulgent, flour tortillas fried in oil then sprinkled with good ol' granulated sugar and cinnamon.  But not so indulgent where you end up hating yourself the next day.  It's supposed to be comforting remember, not hail Mary guilt inducing ;)  So I whip up these little beauties when I want a bit of a naughty snack...so for my thought this week, I think you should fry some of these cinnamon crispas up for someone you love, or you, for that matter.  Fall is in full swing and nothing reminds me of fall more than some good strong cinnamon.  These guys are both savory and sweet.  And yes, these were in fact inspired by the cinnamon crispas found at Taco Bell long, long ago.  I haven't set foot in a Taco Bell in years but I hear they're now called cinnamon twists or something similar to a churro of sorts.  Someone correct me if I'm wrong, but I hear these type of cinnamon crispas are gone.  I always found it interesting how Taco Bell was able to make about 35 different things on their menu, all with the same 5 ingredients.  Weird actually.
 Just cut up a few flour tortillas in 1/8th's
 Fry them up in a few tablespoons of vegetable oil ( a few seconds on each side is all you need)
 flip over and fry a few seconds on the other side
place fried tortillas on a paper lined plate to soak up the oil and sprinkle with a cinnamon sugar mixture
and you've got your self a savory and sweet treat
So what are your go-to comfort foods?  Are they usually things you make yourself, or do you go outside the home for your comfort?
linking up with Mom Trends Friday Foods

Sunday, October 23, 2011

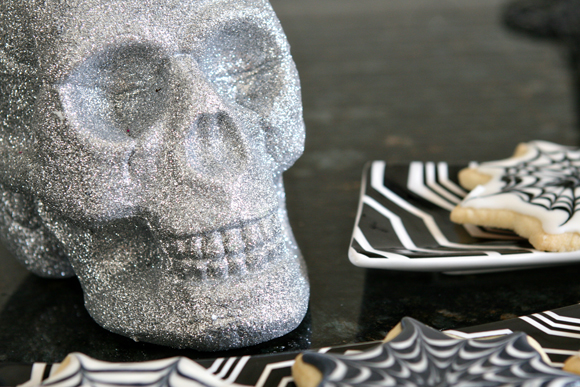
Spider Web Sugar Cookies

Oh boy, here she goes again.  Making those cookies that she doesn't even really love, just for the sake of impressing some kids.  Yup, shameless I know ;)  I saw this spider web cookie cutter at Sur la Table for a buck and I knew that, combined with the pinwheel technique I learned back in July, we could make a winning time waster combination.  

The technique is almost exactly the same as the pinwheel technique, except you don't drag in and out, only out.  So in fact these are even easier to make than the 4th of July pinwheel cookies.  So easy that Taylor was easily able to make these alongside me.  In fact the white and black one pictured right next to the black one is her creation.  So if you have an hour to spare, here's how you go about making these spooky treats...
Repeat, repeat, repeat
I also added a bit more white frosting to my black to make a gray icing which turned out really nice.  I wish I would have made more in the white/gray color combination.
I passed these out after Taylor's soccer game and they were a hit.  Even the Coach came by for a cookie :)
You can see the original pinwheel cookies I made for the 4th of July here. You can also see a video tutorial in this post, and I give some tips I've discovered along the way that has helped me work with royal icing.

Oh, and by the way...the spider web cookie is now on sale for a 49 cents at Sur la Table!   If you don't feel like picking up the spider web cutter, you can easily just make round cookies and the spider web effect would still be just as cool.  Linking up with Heather for Life Made Lovely Monday.

Are there any other spooky fun treats you plan on making for Halloween this year?  I'd love to see some other ideas.  Leave a comment and a link if you're up to something fun.

LinkWithin

Related Posts Plugin for WordPress, Blogger...