Just some shots I took yesterday as I was getting things ready for Friday night crafting with some friends. Hopefully it goes smoothly so I can host more. We'll be making these leather pouches and the rhinestone bangles/friendship bracelets. I'm really just hoping that my cheap sewing machine doesn't break from all the leather it will be sewing. At least we'll have Mary's as a backup.
In between organizing, I got the kids set up with a new craft; iridescent watercolor paper lanterns. The kids loved them, it's sometimes the simplest things like just painting a new object that they always enjoy the most. I'll share some details of this craft next week.
Funny, as I was uploading these very "pretty" shots, I got a little self-conscious for some reason after Friday's post. It just really stuck with me, as well as all your comments. But I hope you know that as much as I'll try to let go of looking good, I will never fully abandon pretty. Just like I'll never abandon being real. I'll just keep trying to walk the line between the both. In fact maybe that's what my new style blog name should be; Walk the Line. Nah. Then people might just expect a bunch of black cowboy hats and Johnny Cash crooning in the background. Happy Thursday friends!
Showing posts with label ; Crafts for Kids. Show all posts
Thursday, September 1, 2011
Wednesday, April 13, 2011
Kid's Easter Craft - Contact Paper Eggs
I take absolutely no credit for these fun little Easter eggs made from contact paper; all credit is due to Taylor and Syd's preschool teachers Mrs. Bailey and Mrs. Hill. Taylor made one of these eggs last year and Syd had a chance to make his own last week. I worked in his classroom that day so I got to see him in action carefully crafting his egg. He loved it so much I knew we had to make more at home, especially since I had an entire roll of contact paper laying around just taking up space.
The kids love this craft because of the sticky texture of the paper and the freedom to create their own collage into whatever design they want. Every single child that made this craft in Syd's preschool all said "It's sticky!!" Such a cute reaction. I would say this craft is good for ages two - seven.
For this craft you'll need:
* Contact Paper
* Various fun bits of tissue paper, cellophane tissue, stickers, confetti, ribbon, whatever really!
* Tissue paper for the backing (or for an entirely clear egg you simply line in more contact paper)
* Tape
* Scissors
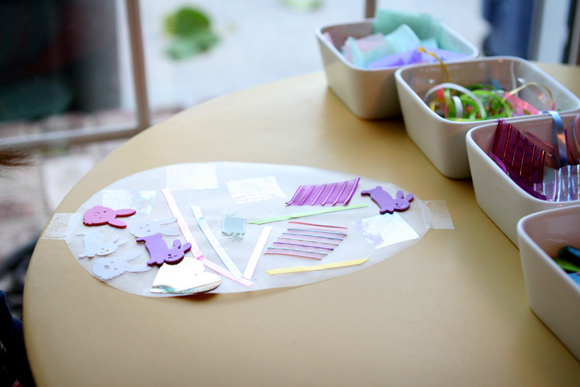
Start by cutting the contact paper into the shape of an egg. Ours were about 9.5" x 6.5" (I fold mine in half to do half the cutting; don't worry, the crease won't be visible when all is said and done)
Peel the backing off of the contact paper and place the contact paper sticky side UP, and tape in place at top and bottom so it doesn't slip around.
And then let the kids just start designing their collage. Taylor is of course much more deliberate in the design, carefully placing each strip of ribbon and paper, whereas Syd carefully chooses each item, and then just plops them wherever :)
Once the egg is complete, peel off the little pieces of tape and then place the tissue paper (or another sheet of contact paper if you want a clear egg) onto the sticky part of the paper. Press into place really well so it's as smooth as possible, and then cut out the excess paper to reveal your egg!
Now let's be honest, this isn't the most beautiful of all beauties of a craft. This is very much a child's craft; even the egg I made came out a little elementary. We're not going for perfection here though ;) The kids honestly love this one so much and it keeps them content and occupied for a good 30-45 minutes at a time. Taylor had a friend over today and they both sat there for 45 minutes crafting an entire scene. Now that's pretty impressive, considering they both had American Girl Dolls they could have been playing with. Happy Easter friends, and please let me know if you try this one!
The kids love this craft because of the sticky texture of the paper and the freedom to create their own collage into whatever design they want. Every single child that made this craft in Syd's preschool all said "It's sticky!!" Such a cute reaction. I would say this craft is good for ages two - seven.
For this craft you'll need:
* Contact Paper
* Various fun bits of tissue paper, cellophane tissue, stickers, confetti, ribbon, whatever really!
* Tissue paper for the backing (or for an entirely clear egg you simply line in more contact paper)
* Tape
* Scissors
Start by cutting the contact paper into the shape of an egg. Ours were about 9.5" x 6.5" (I fold mine in half to do half the cutting; don't worry, the crease won't be visible when all is said and done)
Peel the backing off of the contact paper and place the contact paper sticky side UP, and tape in place at top and bottom so it doesn't slip around.
And then let the kids just start designing their collage. Taylor is of course much more deliberate in the design, carefully placing each strip of ribbon and paper, whereas Syd carefully chooses each item, and then just plops them wherever :)
Once the egg is complete, peel off the little pieces of tape and then place the tissue paper (or another sheet of contact paper if you want a clear egg) onto the sticky part of the paper. Press into place really well so it's as smooth as possible, and then cut out the excess paper to reveal your egg!
Now let's be honest, this isn't the most beautiful of all beauties of a craft. This is very much a child's craft; even the egg I made came out a little elementary. We're not going for perfection here though ;) The kids honestly love this one so much and it keeps them content and occupied for a good 30-45 minutes at a time. Taylor had a friend over today and they both sat there for 45 minutes crafting an entire scene. Now that's pretty impressive, considering they both had American Girl Dolls they could have been playing with. Happy Easter friends, and please let me know if you try this one!
Subscribe to:
Posts (Atom)