Quantcast

Thursday, July 14, 2011

Project 2011: Buy Less, Give More - Meals On Wheels Adventures

 Seven months in and I'm still working on Project 2011 Buy Less, Give More even though I haven't really shared much about it here in the past couple of months.  The monthly spending recaps started to make me feel very exposed and very uncomfortable, just like I was afraid they would.  It turns out that what made me the most uneasy was putting my spending out there for real life friends and family to see.  My parents, my in laws and my closest friends read this blog, and it came up a few times with several of them about spending money on this or that.  It just started to feel a little too strange for me and my husband, so while I continue to work hard at limiting my spending, I just don't share the nitty gritty of the dollars spent here.  Does that matter to any of you out of curiosity? 

The Give More portion of the project is still in full swing as well.  For two months now we have been delivering meals every Tuesday for Meals On Wheels, an organization that can be found pretty much all over the country.  Syd's been with me since day 1 and knows the route as well as I do now, anticipating which houses we'll drive to next and asking when we get to see Eddie who waits on his porch for us each week and comes to the car to greet Syd.  Taylor's been with us for the last 3 weeks now since she's been on vacation and has just started to get the idea of what we do.  She enjoys putting the milk and juice in the lunch bags.

Carmen is the "visitor" who walks the meals up to each house, and is 82 years old, older than many of the folks we deliver meals to in fact.  She sits in the passenger seat while I drive us from house to house and we chat about her grand kids, our summer adventures so far, and I now have her hooked on the Trader Joe's veggie straws.  She's been doing this route for a while now, and in the beginning she made sure I checked our route book at each stop so that I knew where we were going.  She finally trusts me now though and knows I won't get us lost ;) 
 The kids have the sense that we are giving of our time, but not really sure how much of that they grasp.  The first couple of weeks Syd complained about having to go and asked over and over when we'd be done so we could go home.  He doesn't complain at all anymore though, it's become just part of our regular routine.  The butterscotch's may have helped too, a staple in the Meals On Wheels office :)  Even though they may not "get it" now, my hope is that down the road they'll remember us giving of ourselves and connect the dots.

While I know our little contribution here is worthwhile and important, I can't help feeling that it still isn't enough. It still feels all too safe and sheltered.  When we started the route almost 8 weeks ago, we had 11 stops, now we are down to 7 due to hospital stays and even one death.  Our route book lists the ailments of each client and a big pink note labeled "HOSPITAL HOLD" sticks to each stop we're supposed to skip.  You never get the details of what's going on and you don't know how long they'll be gone.  That part is hard, but really as the driver, I still feel very detached.  I see their faces for a brief moment when they open the door and accept a meal, so overall I'm very disconnected and protected.

I'm not saying I need something dangerous or heart wrenching to feel relevant.  And really it isn't about what I need at all.  It's just that I think God has more in store for me and the kids, and how we can help, somewhere down the road.  I love and value this experience right now, but I pray it's just the beginning for us.     
*If you'd like to learn more about Meals On Wheels and the services they provide, or to find a local chapter to volunteer at, please visit the National website here 

Tuesday, July 12, 2011

Playgrounds & Lollipops - Oh, You Again?

{Blouse: James Perse; Shorts: J. Crew; Shoes: 9 West; Purse: Zara;  Belt: Old Navy
Watch & Jewelry: Michael Kors, Stella & Dot, Forever 21, J. Crew}

It's official, I love these shorts.  Not only are they cheerful and a good reminder to be happy, but they can of go with the flow, allowing me to dress them down with a T-Shirt and dress them up with a gold chain and white blouse.  Aren't they cooperative?  And while I don't usually sport so similar of a look 2 weeks in a row, today is the EBEW "yellow" challenge, so I sorta had to.  Plus as I've said before, I often wear similar outfits over and over again until I get tired of them.  These shorts here are no exception.

The shorts aren't the only thing to get a little transformation though this week; my makeup did too.  I put my makeup on in the car and so I carry around the same shades of blush, lipstick/gloss and eyeshadow in a little pouch.  Well, before I left for Scottsdale last week I dug through my stash of makeup and unearthed some oldies but goodies.  Soft hues of peach, taupe and gold blush, lip color and eyeshadow are now my new friends for the next few weeks of summer.  I get stuck in ruts with my makeup routine and need to remind myself to switch it up a bit more.

Do you wear the same shades of makeup day in and day out or are you good about changing direction dependent on the day and your mood?  Any tips on having fun with your beauty routine will be promptly devoured up by this girl :)  Please spill!  Linking up with EBEW and Lindsey for WIWW!


Monday, July 11, 2011

DIY Tassel & Bead Chain Necklace Tutorial

Hi Friends!  How was your weekend?  Taylor and I are back from Scottsdale where we visited and celebrated my dear friend Lea's baby shower and got some much needed girl time as Syd and dad got to have some boy time.  They saw Cars 2 and went to an outer space themed birthday party.  Syd was in heaven.  I got home on an early flight Sunday morning and had a bit of spare time to finish up this fun necklace I've been working on.  I drew inspiration from this Isabel Marant necklace that is originally $175, and while mine didn't come out exactly as fancy as the original, it's still a fun and VERY easy addition to my growing DIY jewelry collection.

There was a lot of love for the Seed Bead necklace tutorial, but the overwhelming theme was that many of you didn't know if you'd have the patience or time to string that many little beads.  I feel your pain, so this necklace is made out of larger beads, and since it's only one strand, you can finish this project in just about an hour!  You need a few more supplies than you did with the seed bead necklace, but they are all inexpensive so you can get everything you need for just around $20.  Let's get started with what you'll need:
Also not listed is a pair of wire cutters to cut your chain and some sort of fabric (details to follow) for your tassel.  The beads I used are a glass bead and cost a total of $6 from a genuine bead store.  I also wanted a more unique looking chain than the options I found at Michael's so I bought my chain for $3.99 at the same bead store.  The crimp beads are on the smaller side, but any size will do really; the jump rings are 7mm, the head pins are 2 inches but you can definitely use shorter ones, and the bead wire is 9.2m.

Start by adding a jump ring to one end of the chain and then with a crimp bead already on the stringing wire, loop the stringing wire through the jump ring
 Make a loop of the wire and put the other looped end of the wire through the crimp bead
 Just like so
 Pull tight and as close to the edge of the jump ring as possible and them crimp the bead closed with the pliers
 Trim off the excess end of the wire like so
 And then begin stringing
 Add a crimp bead to another jump ring on the opposite end of the chain to complete your necklace
 Finished product without tassel :) 
You can start by making a couple of decorative strung beads to hang next to your tassel by adding some beads to a head pin
 Twist the end into a loop
And then trim off the excess wire with the wire cutters
For the tassel, cut a few strips of sheer fabric in 3x3 squares.  I used standard tulle for the black tassel and crushed tulle for the white.  I much preferred the crushed tulle because it was softer and gauzier, not so stiff, but I could only find it in white at my local fabric store.  You could also buy a real tassel that you use for pillows and such, it would probably look really cute, a la Love Maegan.  I just couldn't find a color that I liked to go with the chartreuse green beads.
Basically just fold over the fabric and then tie a strip of tulle around the top to create a little pouf
Cut a straight line at the edge (or don't if you'd prefer not to); I just didn't want it to look so much like a ghost
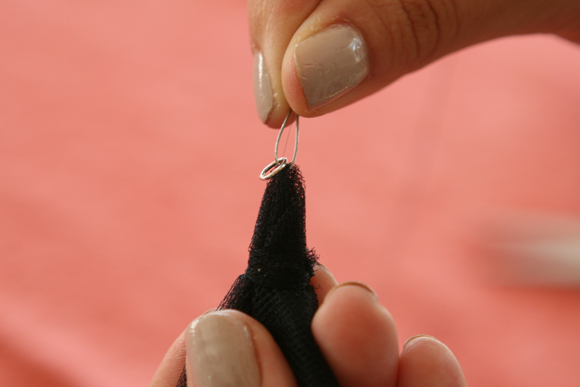
 I'm sure there is a much fancier, more professional way to attach the poof but I couldn't figure it out :)  So I just threaded some of the beading wire though the top with a jump ring attached and then added a crimp bead to close off.  I then attached the tassel directly to the necklace with that jump ring. 
Add your tassel and the other decorative beads and you're done!
My necklace is a total of 36 inches in length, with the chain making up 20 inches and the beads making up 16 inches.  The color options with the project are endless.  My local bead store had so many crazy pretty choices it took me about 30 minutes to make a decision but I kept being drawn back to this acidic green color so just went with it.
 To change the tassel from black to white it's as simple as undoing the jump ring with your pliers and attaching the other tassel.  I love the black for a night time look and then the white for more of a day look.  I wore the white with a navy and striped maxi dress and it really popped against the navy. 
I know it seems like there is a lot of "steps" to this necklace, but really when you break it down into the necklace part, the tassel part and the decorative bead part, it's really very simple and easy :)  Enjoy and let me know if you try it!  For some of my other DIY tutorials, visit here and here

Linking up with Today's Creative Blog for Get Your Craft On Tuesday

Friday, July 8, 2011

Thoughts of the Week - Mourning For An Old Life

 {This picture makes me happy - Source}
Taylor and I are getting on an airplane to visit my friend Lea in Scottsdale.  It's her baby shower.  I hope I don't melt :)  I guess the travel has me thinking about work a lot lately, seeing as how I was traveling just about every month.  Seeing so much coverage over the 4th weekend of NYC also has me a bit nostalgic.  I miss it.  I don't miss my old job per se, and I don't miss that stomach wrenching feeling I got every time I stepped into the airport, but I just miss working, as strange as it may seem.

I know quitting my job was the best thing for everyone including myself, but the sad truth is that no one ever really prepares you for what it will be like to give up a career once you have children.  They tell you about the sleepless nights, colic, breastfeeding, sleep training, baby proofing.  But no one ever sits you down and says "once you have kids you will have to make a very important decision about your career that you worked so hard for."  I know it sounds whiny and selfish, but I'm just letting it roll this morning.  For some woman it's not even a question and the decision comes so easily, so naturally.  It's always been a hard one for me though.  I've always struggled with it.

I was reading over the post I wrote last year when I announced I was going back to work.  Gah, I sound so defensive and bitchy.  I was in such a different place back then though, so scared.  My apologies for anyone who was reading back then.  Man, people gave me a lot of crap though for my decision.  Why do people do that?  Why is there this constant silent fight between working moms and stay at home moms?  I hate it.  Life is hard enough as it is, motherhood is hard enough as it is, we don't need to make things harder for each other.

I love my babies with everything I have and I am so, so thankful that I can stay home with them right now.  I do not take that for granted for a second.  I am thankful for the busy, activity filled days and I'm thankful for the slow and easy days even more.  I'm also thankful for the fact that I had a career that I loved.  I used to get so mad at myself for being torn, but I'm finally coming to the point where I realize it's okay to mourn my old life a bit, to mourn my old career, and it doesn't make me any less of a good mom.  It's taking practice.  But doesn't everything take a bit of practice?

I hope you all have a wonderful weekend.  Sorry for the downer post, just had to get some thoughts off my chest.  XOXO

Wednesday, July 6, 2011

Playgrounds & Lollipops - Color Explosion

{Shorts & Slub T Shirt: J. Crew; Purse: Zara; Sandals: Sam Edelman}
We're still doing color blocking right?  Okay good, because I just figured out a way for this lady to jump on the trend bandwagon without making my eyeballs go blind from brightness.  But dang, this is quite a lot of color!  Only in summer is a color explosion like this allowed right?

We spent the morning at the Rancho Los Alamitos in Long Beach listening to stories and making crafts.  If you are a local this place is amazing and has great kid-friendly events year round that are very reasonably priced.  Miranda was kind enough to take some easy, casual pics of me in front of these amazing trees that are actually in the ficus family.  They're called Dragon Trees because of their large above ground root systems.  But the kids just call them fun climbing structures!

Hoping you all are having a great week and are enjoying all the gifts that summer has to offer :)  
Linking up to Lindsey for WIWW

Mojito Pops

It seems that as soon as summer rolls around, popsicles are passed around just about everyday.  I ordered a new set of molds for the kids; they picked out these cute rocket shapes, and while I was at it, I ordered a fun set to try some grown up pops, found here.  The first recipe I gave a try was a basic Mojito Pop.   When I posted a picture on Facebook of the finished product, lots of friends asked for the recipe, and fortunately it's nothing fancy.  Just a simple mojito recipe frozen for at least 12 hours.  I tend to add a bit more lime to mine and a little less mint, but again, it's all personal preference.
 Mojito Recipe via All Recipes
10 fresh mint leaves
1/2 lime, cut into 4 wedges
2 tablespoons white sugar, or to taste
1 cup ice cubes
1 1/2 fluid ounces white rum
1/2 cup club soda

Place mint leaves and 1 lime wedge into a sturdy glass. Use a muddler to crush the mint and lime to release the mint oils and lime juice. Add 2 more lime wedges and the sugar, and muddle again to release the lime juice. Do not strain the mixture. Fill the glass almost to the top with ice. Pour the rum over the ice, and fill the glass with carbonated water. Stir, taste, and add more sugar if desired. 
*For the pops, simply fill your favorite popsicle mold with the mojito and freeze for 12 hours - very important!

Lots of friends asked if the rum does freeze, and in fact it does.  I'm guessing there's just enough lime juice and club soda to help it freeze.  The texture is definitely more icy than truly frozen creamy type of popsicle, but that's fine by me.  I rolled the top of the pop in some granulated sugar and it took a bit of the edge of the rum off, which tends to float to the top. 

Of course these pops are great, but the only thing better is enjoying them with friends.  Enjoy!
One last little fun fact about these popsicle molds I ordered; there's a drip catcher with a reservoir to help you avoid messy drips and spills.  At the end you can just sip up the rest of your pop so there's not a bit of waste :)  There's also a hallowed out center so that you can add fun garnishes or treats like whipped cream or fresh fruit. 

LinkWithin

Related Posts Plugin for WordPress, Blogger...