It's been a while since I posted any type of DIY accessory tutorial. My creative juices weren't flowing for quite some time, and I've learned to not force something that isn't there. So I sat on these pretty matte and pearl beads for awhile before I figured out what to do with them. And actually it was Taylor that helped get me a bit motivated, asking to make bracelets with me this past weekend. So I got out my beads and we set to work. These are rather very simple little bracelets, but there's something about how understated they are that I really enjoy. Sort of a backlash to the over-the-top arm parties we've been sporting lately. These little pretties just sit there and say "I don't have to be anything other than my dainty self."
Taylor made one for herself in neon green and neon pink, and then went on to make 2 more as gifts for her friends. I love when we carve out time to craft together. Next to cooking, it's my favorite time with her. I wanted to share these (even though they're so very simple) because I thought they might be a nice mom/daughter/girlfriend project to do together. I'd like to make as many gifts for Christmas this year as possible, and I think with these we're off to a good start. So here's all you'll need to make some...
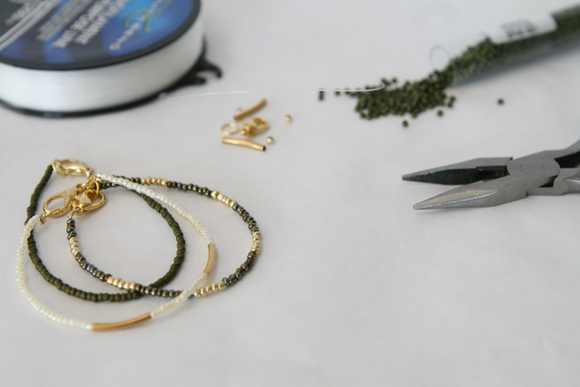
Supplies: Monofilament wire (aka fishing line), 2 crimp beads (per bracelet), 2 jump rings, 1 closure (I used a lobster claw but a magnetic closure would be even better for these), beads (I used seed beads and the longer gold pieces you see are called vermeil spacers, available at specialty bead stores), scissors & jewelry pliers. *please see note below about finishing off strung seed beads
Cut a length of fishing line to fit around your wrist, and loop one end through a crimp bead and jump ring as pictured.
Crimp your bead very gently with your pliers, or if you want to get fancy you can get an actual crimper available at any craft store, but you know, I'm cheap so I just use my pliers :)
String your beads in any pattern you want. I am in love with these vermeil spacers. While they're a little more expensive at $7.99 for a package of 8, I think they do elevate these simple bracelets and give them a nice touch.
When you're done stringing your beads, create another loop around your jump ring that is attached to the lobster claw and crimp bead.
And then just crimp your bead again and cut off the excess wire, and you have yourself a dainty little bracelet in less than 15 minutes.
I made about 8 of these in an evening, and actually made a couple of them extra long so that I could wrap them around my wrist a couple of times. I love them all stacked together or even just a 1 or 2 as a simple statement. And they're so light you don't really even notice them there at all.
*Now a note about this method of finishing off strung seed beads. If you recall in
this seed bead necklace tutorial I posted a while back, I was still doing it the og way I did back in high school, which is quite honestly a little, er, wrong. The nice lady at my local bead store instructed me on the crimping method as the proper way to actually finish off strung seed beads. Which proves the age old adage is true; when in doubt, ASK! :) I hope you enjoy this little tutorial, and please let me know if you give them a try.


No comments:
Post a Comment
Thank you so much for taking the time to leave a comment. I read and appreciate every single one. If you enable your email address I'd love to respond :)